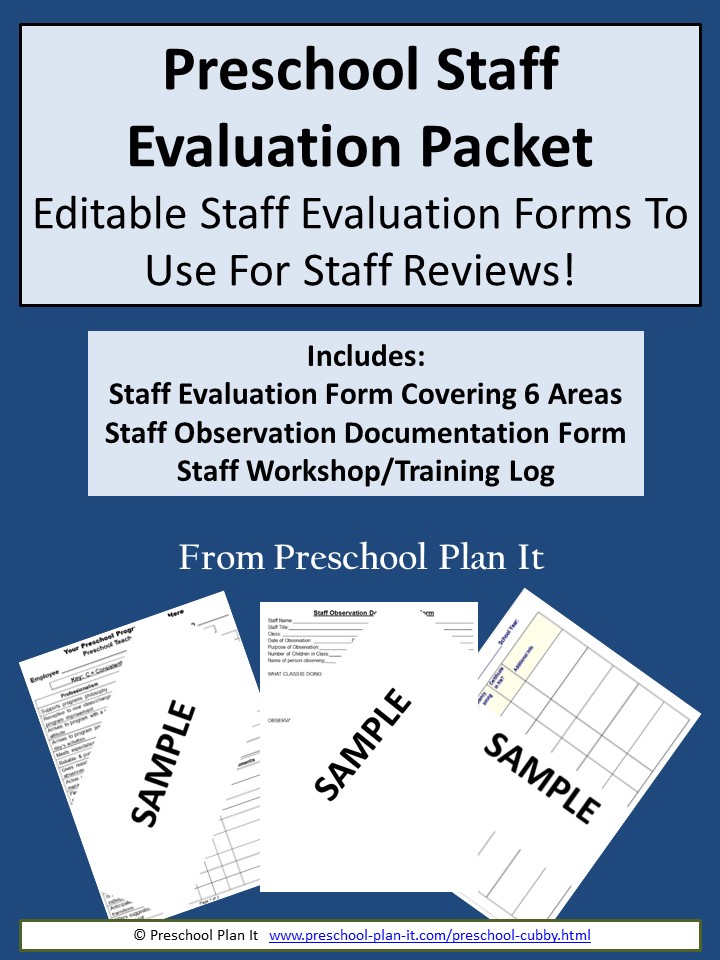
- Theme Packs
- Themes
-
Preschool Planning
- Preschool Teachers

Hanukkah Activities Theme for Preschool
This Hanukkah Activities Preschool Theme page is all about this Jewish holiday which is celebrated for eight days. This celebration of the Festival of Lights is the time of recalling the miracle in Jerusalem when a small amount of purified oil lasted eight days. This celebration time is one for giving and sharing with others. Some of the symbols of this holiday are the menorah and the dreidel.
You'll find more themes to help you with your planning on my preschool themes page.
A Hanukkah Activities Theme for Preschool that includes Hanukkah songs, games and activities! This page includes preschool lesson plans, activities and Interest Learning Center ideas for your Preschool Classroom!
Let the Hanukkah Activities Theme planning begin!
You can either scroll down through this page to see all of the preschool activities for your theme or click the link below to go to specific preschool activity types you are looking for.

Hanukkah Activities Theme Art
Make a Menorah
Materials needed: poster board, birthday candles (9 per child), nuts (as in the kind that go with screws or bolts) to fit candles in (10 per child), craft glue (not school glue) and a hot glue gun.
The holder that holds the candles is called the Menorah. There are 9 lights on it, with the middle one called the shammesh. This is the helper candle and is a little taller than the others.
Each night, the shammesh is lit and used to light the other candles.
So on day 3 of Hanukkah, 3 candles AND the shammesh are lit that evening.
Give each child a strip of poster board or sturdy tag board. Have them print their name on it as best they can.
Squeeze a line of glue down the center of the strip.
The children place nine nuts next to each other. With a hot glue gun--the teacher or adult glues a second nut on top of the middle one (or the 5th nut in the row).
The children squeeze a little glue in the hole of each nut and place a birthday candle in.
My Dreidel Top
Materials needed: either 1/2 pint milk containers (one per child) or a small, square gift box with cover (again, 1 per child); construction paper squares, markers, glue sticks, sharpened pencils.
If using milk cartons, fold and tape the tops down to make a square. If using boxes, glue the cover in place with a glue gun.
Either trace squares on construction paper for the children to cut out (great scissor practice!) or precut the squares.
The children decorate each square with markers and crayons.
The children glue a square on each side of the carton or box.
Insert a sharpened pencil into the box (short pencils) to be the spinner so they can spin it like a top!
Star of David
Materials needed: Triangle stencils (I made them from a manila folder); markers; scissors; construction paper; white paper; glue sticks
Have the children trace and cut out 2 triangles from the color of construction paper they choose (or, we provided yellow paper).
The children then move the 2 triangles around to make the star. Teach them what the word "invert" means as you tell them to "invert" one star on top of the other.
They glue them into place.
Dreidel Painting
Materials Needed: shallow tray or box cover, variety of paint (each watered down a bit), dreidels, white paper, pipette or spoon
The children place their paper in the box cover or tray.
They use a pipette to squeeze a few different colors of paint on the paper.
Then they spin the dreidel on the paper to move the paint around.If they can not spin the dreidels, encourage them to shake the cover/tray from left to right and back and forth to move the dreidel around the paper through the paint. (Same concept as marble painting).
Variation: The children dip the tip of the dreidel into a color of paint and then spin it on the paper and continue with many colors.
Hanukkah Frames
Materials Needed: colored foam sheets, dreidel stencil, photo of each child, paint, sequins, glitter, glue
Let the children trace and cut out the dreidel stencil onto paper.
They then decorate it with the materials you provide.
Glue their picture in the middle when they are done.*
*Note: If you are using printed pictures (from a printer), wait until the frame is dry and use a glue stick or tape as any liquid will make the ink on the picture bleed through.
Variation: Hot glue a sturdy magnet to the back to turn this into a refrigerator magnet.
Variation 2: Hot glue a pinch type clothespin on the back and hot glue the clothespin to a sturdy magnet to turn this into a way to display future artwork on the refrigerator.
Dreidel Paint Wash
Materials Needed: large dreidel shaped stencils (cut a few out from manila folders), scissors, white crayons, white construction paper, watercolor paint
The children trace a dreidel shape on the paper using the stencil and then cut out the shape.
They make designs on the paper with a white crayon.
They then use watercolor paint to paint their entire dreidel (watercolor paint or liquid watercolor).
The paint won't stick to the crayon, leaving some awesome designs!
Hanukkah Wreath
Materials Needed: paper towel tubes cut in half, paint, craft sticks, glue, glitter, poster board
Each child pains one have of a paper towel tube.
Help each child make a Star of David out of craft sticks (or make one for each child in advance).
The children brush glue on the star and sprinkle glitter on it.
When the tubes are dry, have the children arrange them into a circular wreath pattern on poster board. Hot glue the tubes in place.
Then hot glue their stars on the tubes.
Hang in your classroom!
CD/DV Dreidel Spinners
Materials Needed: old CDs/DVDs, markers, paper
Place a CD/DVD on a piece of paper. The children place a marker in the hold of the CD/DVD and then spin it on the paper--it's like dreidel art!
Hanukkah Activities Theme Block Center Ideas
Build a Menorah (Thank you, Amber, for this idea!)
Provide a picture or poster of a menorah in the block area and at least 8 cylinder shaped blocks or containers wrapped to symbolize candles. Encourage students to build a menorah using a variety of wooden shaped blocks and the "candles" provided.
Hanukkah Activities Theme Circle Time
Circle Time is such a great time for children to learn the social skills of being together as a large group AND to learn more about your theme!
What is a Menorah?
Bring a Menorah and candles to Circle Time.
Explain what a menorah is. Choose 9 children to be a live menorah!The child in the middle is the shammesh, the helper candle. He/she stands up tall, with arms in the air.
The other children stand next to the shammesh (4 on one side and 4 on the right).
Teach them the following poem and act it out. Continue until all children have had a turn.
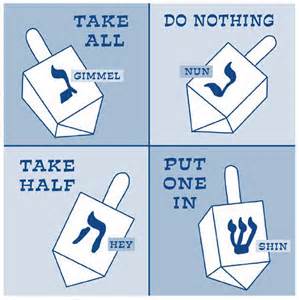
A Dreidel
Dreidels have Hebrew letters on each of the four sides. The letters mean take nothing; take everything, take half, put one in.
Bring some manipulatives to circle as well, such as a collection of marbles, milk caps, beans, etc.
Bring several dreidels to circle. Show the children how they work and let them all have turns using them.
If your circle time is on a carpet, bring a sturdy box cover for the children to spin them in. Teach them the following fingerplay!
My Dreidel
I have a little dreidel (make index fingers and thumbs into a square)
I made it out of clay (pretend to be using clay with hands).
And when it's dry and ready (flatten hands to pretend to hold it).
Then with it I will play (pretend to spin the dreidel on the floor).
Hanukkah LightsMaterials needed: In advance, make 9 candles and a menorah shape for your flannel boards.
Teach the children the following fingerplay.
Once you've done it a few times together, hand out the flannel candles and have the children place a candle on the flannel board as you all say the poem again.
Continue until all the children have had a turn putting a flannel candle on the board.
One light, two lights, three lights then four (hold up fingers one at a time).
Five lights, six lights, and then three more.
Twinkle, twinkle night pretty lights (wiggle fingers)
In a golden menorah so bright!
Hanukkah Cooking Activities
Hanukkah Light
Needed: Pineapple slices, maraschino cherries, bananas
- The children place a pineapple ring on their plate.
- They then slice a banana slice off and place it in the middle of the pineapple.
- The push one cherry into the banana.
Ka'achei Sumsum (Bagel Cookies)
4 c flour; 1 c margarine; 1 t salt; 3 T cake-form yeast; 1 eg; 1 c warm water; 1/4 t sugar
- Put yeast and sugar in a bowl.
- Pour it over the warm water.
- Let sit in a worm place for about 10 minutes or until yeast rises.
- Mix flour, margarine, salt and dissolved yeast into a dough.
- Cover with towel. Sit in a warm place for 2 hours.
- When dough rises, take small pieces from it and roll into strips (snakes!) about 4 inches long
- Join the ends to make a bagel shape.
- Brush with beaten egg and place on greased baking sheet.
- Bake at 350 for 20-30 minutes.
My Menorah Snack
Needed: bread, butter, pretzel sticks.
The children butter their bread and then place pretzel sticks in the bread as the candles.
K'naidlach SoupLatkesApplesauce
3 eggs; 3 1/2 c matzo meal; 1/2 of a chicken bouillon cube; 1 t celery leaves, chopped; nutmeg; juice from 1/2 a lemon; salt; pepper; chicken soup
- Beat eggs
- Add bouillon, salt, pepper and pinch of nutmeg.
- Add lemon juice and celery leaves.
- Continue to beat.
- Slowly add matzo meal using a wooden spoon.
- When it thickens, knead by hand.
- Form small balls (about 1 inch).
- Place in a deep dish and refrigerate for 3 hours.
- Heat chicken soup/broth to boiling.
- Drop in matzo balls.
- Let cook 10-12 minutes.
- Place 2-3 matzo balls in a bowl with soup.
- Add lemon juice to taste.
Latkes
Needed: Ingredients 3T flour; 6 potatoes; 1 egg; 1 t salt; 1/8 t pepper
- Have children help you wash the potatoes with a vegetable brush.
- Cut the potatoes in half.
- Have them help you grate the potatoes.
- Mix the dry ingredients with the grated potatoes.
- Now the adults job:
- Heat olive oil in a skillet. Drop heaping tablespoons of the latke mixture into the oil.
- Fry both sides until browned.
- Let cool on paper towels (this helps absorb extra oil).
- Have children help you make home made applesauce!
Applesauce
Needed: Apples, water; cinnamon (optional) apple slicer (I LOVE my apple peeler/corer!) AMAZON LINK; plastic knives, pan
- Have the children help you slice and core apples if you have an apple peeler/corer. If you don't, peel and core the apples and let the children cut the apples.
- Have the children cut the apple into small pieces and place in pan.
- Add water (about 3/4 c for every 4 apples).
- Heat apples over low heat until soft.
- Mix briskly with a wisk.
- Add and mix in cinnamon (optional)
- Enjoy!
Hanukkah Activities Theme Ideas to Transform Your Dramatic Play Area
Gift Wrapping Station
Provide bows, paper, tape and boxes for the children to wrap presents.
You can also add a Hanukkah set to your housekeeping are.Hanukkah Theme Ideas for your Easel--
More Than Just Painting (Although that is always THE favorite in our classroom!)
Dreidel Letters
Hang up the Hebrew letters from the dreidel on the wall near your easel.
Your children can try to create them!
Provide large and small brushes!
Hanukkah Activities Theme Large Group Games
To Help Preschoolers Build Their Muscles While Having Fun Together!
Hot Latkes
Bring a potato to the area. Have the children sit in a circle.
Play some music. The children pass the "hot" potato latke around.
When the music stops everyone freezes. The child holding the potato yells "Hot Latke!".
Continue until all the children have had a turn.
Find the Gelt
Gelt (pronounced with a hard "g" sound) is Yiddish for money.
Hide some coins (silver dollars or pieces of large cardboard covered in aluminum foil) around the area for the children to find.
When they find one, they bring it back and place it in a bowl and sit and wait for their friends to find one.
The children will want to take the Gelt outside to play hide and seek with it at outside time as well!
Pin the Candle
Make a large menorah out of poster board and hang it on the wall.
Make large candles.
Play this like pin the tail on the donkey.
The children are blindfolded and try to tape the candle on the menorah.
Hold on--Do you want a week-long Hanukkah Theme?

With a completed weekly planning form, daily planning forms and printables?
I've got you covered!
Take a week off from planning!
Click here to learn more!Hanukkah Activities Theme Ideas for Your Library
Book Suggestions for the Library
(I LOVE Amazon, and some of the links below will take you to the Amazon website. If you do choose to purchase yours through Amazon, they do send me a few cents--which supports my coffee habit! )
Arielle and the Hanukkah Surprise (Read With Me) by Devra Speregen and Shirley Newberger
The Chanukkah Guest by Eric Kimmel
Grandma's Latkes by Malka Drucker
Hanukkah! by Roni Schotter
The Hanukkah Mice by Ronne Randall
Latkes And Applesauce: A Hanukkah Story by Fran Manushkin
The Ziz and the Hanukkah Miracle by Jacqueline JulesHanukkah Activities Theme Activities to Help Your Preschoolers Develop Their Math Skills and the Small (Fine) Muscles In Their Hands!
Themed Puzzles
Provide themed puzzles for the children to use.
Create Your Own Themed Puzzles
Create large shapes on poster board to represent the holiday such as a large dreidel, menorah, candle, Star of David, etc.
Color and laminate.
Cut into pieces for the children to put together as puzzles.
Star Sort
Make Stars of David in different colors, patterns and sizes for the children to sort, make patterns with or seriate (small to large)
Hanukkah Activities Theme Music and Movement Activities and Ideas to get your Preschoolers Movin' and Groovin'!
Frying Donuts
Oil is significant in cooking for the holiday. Have the children pretend to be donuts frying in oil, acting out each part as you sing the following together!
Sung to the tune of I Had a Little Turtle
I had a little donut (children curl up in a ball).
It is so nice and light (they hop gently up and down)
And when it's all done cooking (get on floor and hop in the "oil")
I'm going to take a bit (jump out of the "oil").
Menorah Candles
Sung to the tune of Twinkle, Twinkle, Little Star
Twinkle candles in the night,
Standing on the menorah bright.
Burning slow, we all know.
Burning bright to give us light.
Twinkle candles in the night,
Standing on the menorah bright.
Hanukkah! Hanukkah!
Sung to the tune of Three Blind Mice
Hanukkah! Hanukkah!
Hanukkah is here! Hanukkah is here!
Light eight candles in a row.
Light eight candles and see them glow.
Light eight candles so we all know,
That Hanukkah is here!Sing a Song of Hanukkah
Sung to the tune of Did You Ever See a Lassie?
Oh, sing a song of Hanukkah, of Hanukkah, of Hanukkah.
Sing a song of Hanukkah. A Happy Holiday!
With presets and presents,
On every night one present.Oh, sing a song of Hanukkah,
A Happy Holiday!Shammash Candle
Sung to the tune of Twinkle, Twinkle, Little Star
Shammash Candle, share your light,
With ONE candle the FIRST night.Shine so brightly in the dark.
Share so gently with your spark.Then out you'll go to rest and then,
Tomorrow night you'll shine again!Replace the bold words above with the words for each night:
TWO-SECOND, THREE-THIRD and so on. At the end, change the list line of the song to:
Next year you will shine again!Five Little Latkes (Fingerplay)
Sung to the rhythm/tune of 5 Little Monkeys
Five little latkes were sizzling in the pan (wiggle 5 fingers).
One jumped out and say, "Catch me if you can!".
And it jumped and it ran all around the kitchen floor (make fingers run on the floor in front of you).
When I turned around they ran right out the door! (Make a surprised face).
Now there's 4 little latkes sizzling in the pan (wiggle 4 fingers)...
Continue with 3,2,1.
Light the Candles Bright
Sung to the tune of Farmer in the Dell
Oh, light the candles bright,
and dance around the light.Heigh-ho the derry-oh,
It's Hanukkah tonight!Spin the Dreidel round,
and watch it falling down.
Heigh-ho the derry-oh,
It's Hanukkah tonight!Latke treats to eat,
and family to greet.Heigh-ho the derry-oh,
It's Hanukkah tonight!I Am Lighting All the Candles
Sung to the tune of I've Been Working on the Railroad
I am lighting all the candles,
On this Hanukkah night.I am lighting all the candles,
To see the shining bright.Flicker, flicker little candles.
Fill me with your glow.Now the time has come to count them:
Ready, set and Go!1-2-3-4-5-6-7-8
The Latkes Are Frying in the Pan
Sung to the tune of When Johnny Comes Marching Home
The latkes are frying in the pan. Hurrah! Hurrah!
The latkes are frying in the pan. Hurrah! Hurrah!And when they've cooked so niche and brown,
We'll take them out and sit right down.And we'll eat those yummy latkes this Hanukkah night!
Hanukkah Activities Theme for Your Sand and Water Table!
Sand Temples
Spray your sand with water. Provide cups and other items for the children to build a sand temple with. Provide rocks, sticks, etc. for them to build with.
Hanukkah Activities Theme Science Activities--for your Preschool Scientists in Training!
Shadow Puppets
Provide flashlights and holiday shapes (dreidel shape, menorah shape, star of David shape) cut out of cardboard and glued onto craft sticks.
The children flash the light onto the shapes to see their shadows on the wall.
Oil Scientists
Provide different items for the children to experiment with.
Provide clear cups, spoons and pipettes and any of the following:
Water, liquid soap, juice, milk, vegetable oil, etc.
Writing Activity Ideas for Your Hanukkah Activities Theme!
Donation Station
Provide magazines, scissors, glue sticks and paper.
Have the children print their names on the paper.
Have them find and cut out canned goods from the magazines and glue onto the paper.
These papers will be the flyers that you will send home for the donation idea below under "Miscellaneous".
Have the children write a note to their parents about what they are doing with the donations.
Hang word cards at the writing center. Some of your children will want to print their own words on their papers such as:
Help others. Love. Hanukkah.
Miscellaneous Hanukkah Activities
Help your preschoolers to help others.
Use the letters the children make in the Writing Center activity to either sent home or hang in your school.
Take up a collection of items needed by your local food bank to help others.
EXTENSION: Before donating the items, have the children help you to count the items, sort them by food type and talk about how these items will be helpful to others.
Go to MAIN THEMES Page for more theme ideas!
Go to Preschool Plan It's Home Page


Hey there! Welcome to Preschool Plan It! I’m Cheryl, a preschool teacher of over 20 years.
I KNOW, I know, you spend hours of time developing your preschool themes, activities and preschool lesson plans each week. You are commited to planning preschool themes and activities that are engaging hands-on, interactive, fun AND meet the goal of supporting each child’s level of growth and development.
I am commited to providing you, the preschool teacher, with everything you need to develop preschool lesson plans and preschool activities for your classroom all in one place!
READ MORE
Join My Free Preschool Teacher Tips Newsletter
You’ll receive a weekly email with planning tips and teaching ideas.
You'll also receive (on the 1st of each month) a free theme starter pack with some printables and activity ideas to get you started planning a theme!Join Now and Get Your First Theme Right Away!
- Preschool Teachers


